How to fix a push button toilet that won’t flush
Dealing with a push button toilet that refuses to flush can be a frustrating experience. However, before you call in a professional, it’s worth exploring some troubleshooting steps we have put together to identify and potentially fix the issue. With a little effort and some basic tools, you might just be able to fix it yourself.

Step 1: Open the Toilet Tank Lid
Begin by ensuring your safety. Turn off the water supply to the toilet and carefully remove the tank lid. Set it aside on a secure surface to prevent any accidental damage.
Step 2: Examine the Flush Mechanism
Inside the toilet tank, you’ll find the flush mechanism – the essential components responsible for the flushing process. This includes the flush valve, overflow tube, and the push button assembly.
Inspect the flush valve for any visible damage, debris, or potential blockages that could hinder proper flushing. Take a moment to check the chain or cable that connects the push button to the flush valve – sometimes, a tangled or disconnected chain can disrupt the flushing process.
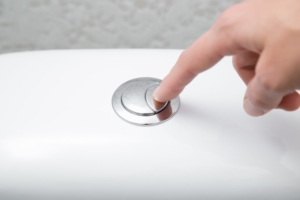
Step 3: Test the Push Button
Press the push button located on the top of the toilet tank and observe its action. If you notice that it feels loose, lacks resistance, or makes a clicking sound without initiating a flush, the push button assembly itself may be the culprit. Carefully remove the assembly for closer inspection. Look for signs of wear, corrosion, or misalignment. If necessary, replace the assembly with a suitable replacement part.
Step 4: Verify the Water Level
A correct water level inside the toilet tank is crucial for proper flushing. The water level should ideally sit about an inch below the top of the overflow tube. If it’s too low, you can adjust the float mechanism, which is often a ball float or cup float. This adjustment allows more water to fill the tank, potentially resolving flushing issues. Conversely, if the water level is too high, adjust the float to lower the water volume.
Step 5: Assess the Flapper Valve
The flapper valve controls the release of water from the tank into the bowl during a flush. A damaged or misaligned flapper can lead to weak or incomplete flushing. Inspect the flapper for any signs of cracks, warping, or mineral buildup. If required, replace the flapper with an appropriate replacement part.
Step 6: Clear Blockages
If none of the previous steps have resolved the issue, it’s time to check for blockages. A clog in the toilet trap or drain pipe can obstruct water flow and impede proper flushing. Utilise a toilet auger or plunger to clear any potential blockages. Use these tools carefully to avoid causing any damage.
Step 7: Reassemble and Test
With repairs or adjustments completed, reassemble the components within the toilet tank. Turn the water supply back on and allow the tank to refill. Test the push button once more to see if the flushing problem has been resolved. If the toilet flushes as expected, congratulations – you’ve successfully tackled the issue.
While a push button toilet that won’t flush can be frustrating, it’s important to remember that many common issues have straightforward solutions. By following the steps outlined in this guide, you can diagnose and potentially fix the problems affecting your toilet’s flushing mechanism. However, if you encounter complex issues or are uncomfortable performing DIY repairs, don’t hesitate to seek professional assistance.
Excel Plumbing and Heating are here to help further. As well as stocking a range of push button toilets, we also offer flush buttons and plates.


 Richard Casson2023-10-27I’ve bought plumbing supplies from Excel a load of times in the last couple of years and would recommend them to anyone — best plumbing store in the area.
 ben Flowerdew2023-09-27Went in with little knowledge and the guy managed to put together everything i needed. Very good service over all. Highly recommended
 Simon J2023-06-17Popped in this morning to get some advice about a seized bath mixer tap. Complete spacker when it comes to anything plumbing related. Really friendly guys gave excellent advice and sold me exactly what I didn't know I needed after I tried to explain the problem. Fitted by myself and perfect result thus saving me the cost of paying a plumber and having to replace whole tap unit. Thanks so much 😊👍
 Jessica Joseph2023-04-25Really professional, helpful and did a great job in good time. Would definitely use them again for any future bathroom works.
 Pam Cowburn2023-04-13Excellent customer service. They talked me through everything I would need for a new bathroom and were very patient when I changed my mind a few times! They were also really competitive on price.
 Julie Weir2023-03-25I used Excel for Bathroom supply and fit recently and they are one of the most reliable, responsive, pro active, conscientious and professional companies I have ever used in the flat. I live in a decent sized 2 Bedroom flat in N4 and I found the company as they are local to the area, after 2 awful experiences with Wickes and B and Q in the past on my kitchen and another renovation. Excel were wonderful - assisting in design, helping trouble shoot issues, offering advice and also finished the build and works on time which is also a rare thing these days! Great knowledge, excellent workmanship, flexible attitude and they very much take pride in their work. On top of it all, wonderful people all round and very easy to be around when the flat was being pulled apart too! HIGHLY RECOMMENDED....
 Kyle Rogers2022-10-01Incredibly helpful. Knowledgeable staff
 Tom B2022-08-10Really helpful advice and service. I’ve saved time and money today fixing up a broken sink waste and toilet flush that have been on my to-do list for so long.
 Jude Fitzgibbon2022-06-25Excel Plumbing - they are a local vendor to us so we popped around - seems to be run by two brothers - we got all our basics from them (bath sink, toilet, shower.....) for a bathroom fitting, very knowledgeable, responsive on deliveries and provided several brochures to review. Gave a significant discount on the list price. They took their time and explained everything - we couldn't ask for any more - Jude & Emanuela

Local Presence
If you're in close proximity, why not explore the option of establishing a trade credit account with us?

FAQ's
Explore responses to our most commonly asked questions and find the information you're looking for.

Sales Assistance
Consider stopping by our sales counter, where our experienced team is eager to assist you.

Contact us
If you have any questions please get in touch and one of our advisors will be happy to help.